I have been using eM Client for quite a while without any problems. It’s a very good programme! I recommended it to a friend of mine who knows little about computers, and she took my word for it. She is now facing two problems:
She has been using the POP3 protocol until now, but is now getting the error message “ERR could not get message”. I’m not sure why this has turned up after almost a year.
I then set up a second account using IMAP as the standard protocol. Unfortunately, it was not possible to simply change her account settings from POP3 to IMAP, which appears to be related to her long-standing German provider. Otherwise, there were no issues.
However, when I tried to move the archived emails from the POP3 account to the IMAP account, the following error message appeared: “Not supported characters”. As she has many directories and subdirectories, it is difficult to identify these characters and locate them. I would have to open dozens of directories and almost one hundred subdirectories.
Is there an easier way?
Many thanks in advance for any advice you can give me!
Yes you can’t simply change a POP account in eM Client to IMAP.
Normally you leave the POP account setup in place, and then just “add a second account in eM Client with the same email address as IMAP”, and, then “create the same folders in the new IMAP account”. Then drag or move emails from the POP account directly to the IMAP account.
After you drag them, eM Client will then start uploading / synching them to the IMAP account which can take time. You can see when that’s completed in “Show Operation” via the dropdown on the right of Refresh. Then once you are confident the messages are all in the IMAP account, then remove the POP account.
However if you are getting “Not supported characters” when trying to drag or move emails directly to the IMAP account then “try first on the POP account exporting those account messages to (.eml) files to a folder on the desktop via “Menu / File / Export” and see if you still get those errors.
Then if that exports the POP account messages ok without any errors, then go to “Menu / File / Import” and try reimporting the exported desktop folder .eml files into the IMAP account.
Many thanks for your detailed reply! I was at my friend’s place earlier today and wanted to follow up on the steps you described.
Unfortunately, I did not find the option you mentioned “add a second account in eM Client with the same email address as IMAP”.
For now, I have just put the existing POP3 account on hold, so that the error message “ERR could not get message” no longer appears. It is not the perfect solution, in particular because the archive is not (yet) part of the IMAP account, but instead is still found in the POP3 account archive. But this is not really a big thing, or so she says…
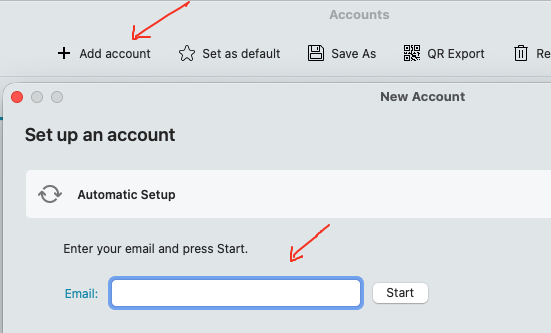
To add a second account “with the same email address” as an IMAP setup, you just go to “Menu / Accounts” and click “Add Account” along the top and “enter the same email address in there” and follow the wizard which will normally then setup the account as IMAP by default if the server supports auto discovery automatic setup.
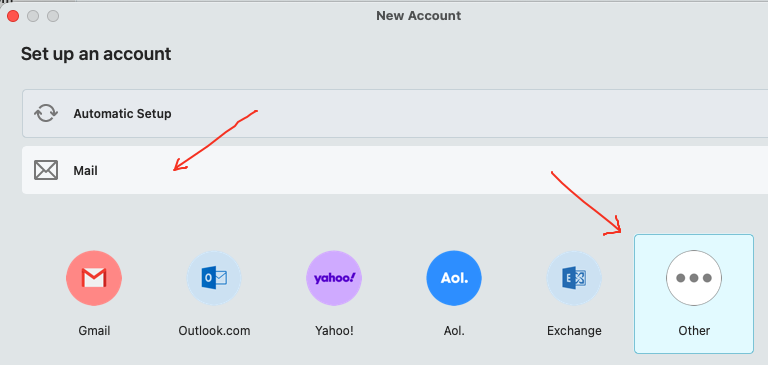
Or if the mail account has to be manually setup with a legacy username and password with IMAP (depending on the server requirements), then click “Add Account” / Mail / Other" and click next and enter the email address and then click next and select IMAP and enter the details manually.